Goldsmithing and Enameling Tools: Iron Hoods / Muffles and Trays.
This is Part 6 of my series of blog posts related to my Late Anglo-Saxon Enamel Disk-Brooch project on the historical tools used in Goldsmithing and Enamelling from approximately the 2nd-century BCE until the middle of the 2nd-millennium CE.
 |
| Figures A to J. |
I was inspired by the hood/muffle sets that two fellow Enamelers each fabricated and based on Theophilus' description from, 'On Diverse Arts'. A couple of years ago I saw the set made by THL Alys Treeby, my Apprentice Belt-Sister, she's had multiple successful enamel firings on a Blacksmith's charcoal heated forge. Recently Sir Ælfwyn Langanwuda sent me photographs of the set she fabricated. This past weekend she was able to use it with great success on her period bead kiln that she's repurposed, previously she used a blacksmith's forge as a heat source. Both of their hoods are appropriately 3-inches in diameter.
In May of this year, Doug Colin Guyton fabricated for me a perforated, domed hood/muffle and tray (see Figure M.) based on my research of Theophilus' Treatise, ‘On Diverse Arts’. Both the domed extant and reproduction pieces have handles though shaped differently. Theophilus' description is of a flat tray similar to a pizza paddle, and the domed Georgian extant tray is concave, similar to a frying pan.
 |
| Figures K and L. |
Over the next year I plan to experiment with my muffle set using a charcoal forge to solder, enamel and fuse. I hope to fabricate another domed muffle/hood as well as conical shaped ones, based on the extant finds of the “Iron hood, Vani, second half of the 2nd century B.C.”.
The hood/muffle and its tray are used on a charcoal forge (see Figures B and O) or with a furnace, both are smaller than what Blacksmiths use(d). They are placed on top of heated charcoal and other heated pieces of charcoal are piled a couple of inches high around the hood. Since the holes in the hood/muffle were punched from the interior outwards, the sharp edges of the cut and stretched metal point outwards, much like a cheese grater, and help reduce how much ash and particles can enter. The charcoal quickly heats the metal and interior space. Once the needed temperature range and time have been reached then the charcoal can be carefully brushed away from the sides and the entire hood/muffle and tray can be removed from the forge or furnace.
"A copy of the Colchian cloisonné hood was made and tested, which showed that the Colchian “hood" is a goldsmith's tool – an iron muffle. If placed underneath a pile of burning coals as described by Theophilus, high temperatures are achieved inside the muffle and a highly skilled jeweler can perform work on glass, gold or silver." (Ermile Maghradze, Nature, June 2014)
I am researching the writings of three other historical figures in hopes of finding more information on the tools and techniques of pre-Renaissance soldering, fusing, and enameling techniques. I will continue to write blog posts of my experiments and findings over the coming year.
 |
| Figures M to P. |
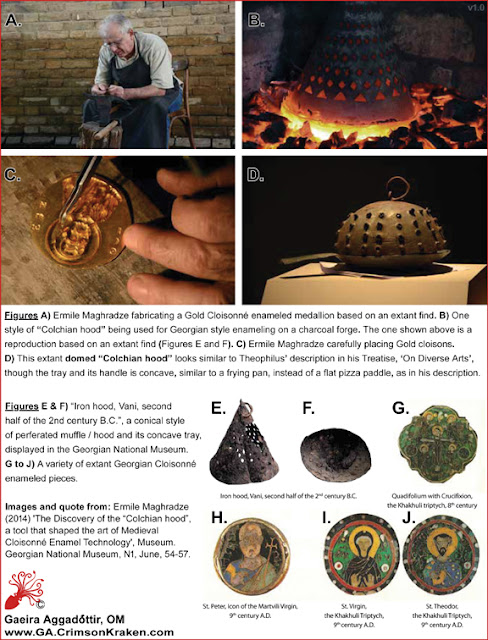
Figure A.
Ermile Maghradze fabricating a Gold Cloisonné enameled medallion based on an extant find.
Figure B.
One style of “Colchian hood” being used for Georgian style enameling on a charcoal forge. The one shown above is a reproduction based on an extant find (see Figure K and L).
Figure C.
Ermile Maghradze placing Gold cloisons on the back plate.
Figure D.
The perforated, domed hood looks like Theophilus’ description in his Treatise, ‘On Diverse Arts’, though this extant Georgian base is concave, similar to a frying pan, instead of flat like a pizza paddle, as in his description.
Figures E & F.
“Iron hood, Vani, second half of the 2nd century B.C.”, a conical style of perforated muffle / hood and its base, displayed in the Georgian National Museum.
Figures G to J.
A variety of Georgian Cloisonné enameled pieces.
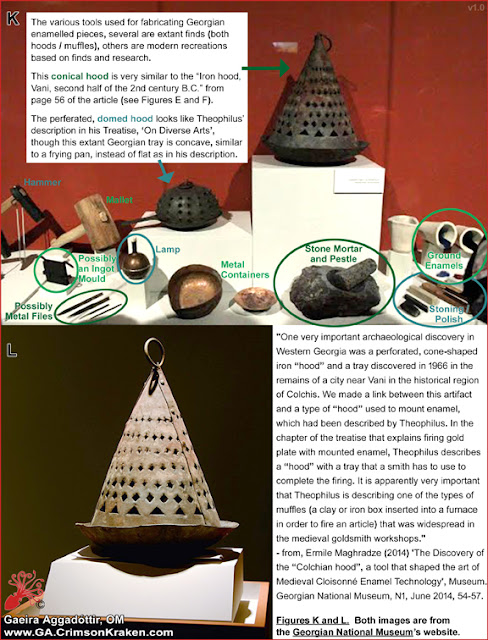
Figure K.
The various tools used for fabricating Georgian enameled pieces, several are extant finds (both hoods), others are modern recreations based on finds and research.
This conical hood is very similar to the “Iron hood, Vani, second half of the 2nd century B.C.” from page 57 of the article.
The perforated, domed hood looks like Theophilus’ description in his Treatise, ‘On Diverse Arts’, though this Georgian base is concave, similar to a frying pan, instead of flat as in his description.
Figure L.
"One very important archaeological discovery in Western Georgia was a perforated, cone-shaped iron “hood” and a tray discovered in 1966 in the remains of a city near Vani in the historical region of Colchis. We made a link between this artifact and a type of “hood” used to mount enamel, which had been described by Theophilus. In the chapter of the treatise that explains firing gold plate with mounted enamel, Theophilus describes a “hood” with a tray that a smith has to use to complete the firing. It is apparently very important that Theophilus is describing one of the types of muffles (a clay or iron box inserted into a furnace in order to fire an article) that was widespread in the medieval goldsmith workshops."
- from, Ermile Maghradze (2014) 'The Discovery of the “Colchian hood”, a tool that shaped the art of Medieval Cloisonné Enamel Technology', Museum. Georgian National Museum, N1, June 2014, 54-57.
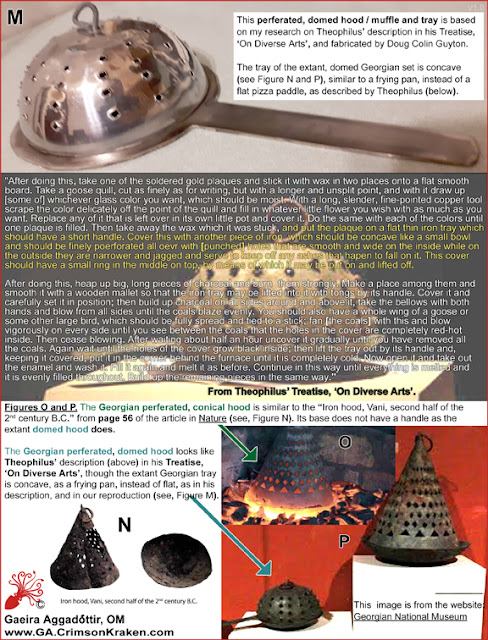
Figure M.
This perforated, domed hood was fabricated by Doug Colin Guyton based on my research of Theophilus’ description from his Treatise, ‘On Diverse Arts’.
The base of the domed Georgian extant set is concave, similar to a frying pan, instead of flat like a pizza paddle, as the version that Theophilus was familiar with.
Figures O and P.
The conical hood is similar to the “Iron hood, Vani, second half of the 2nd century B.C.” from page 57 of the article in Nature. Its base does not have a handle like the domed hood.
Figure P.
The perforated, domed hood looks like Theophilus’ description in his Treatise, ‘On Diverse Arts’, though this Georgian base is concave, similar to a frying pan, instead of flat as above in our Theophilus reproduction.
Figures A thru J, N, O, and several quotes are from:
Ermile Maghradze (2014) 'The Discovery of the “Colchian hood”, a tool that shaped the art of Medieval Cloisonné Enamel Technology', Museum. Georgian National Museum, N1, June, 54-57.
Figure M.
Photograph by Gaeira Aggadottir.
Figures K, L, and P.
These images are from the Georgian National Museum’s website.


