My 'Little Project', a.k.a. Coronets. Part 2

Baronial Coronets for the
Barony of L'Ile du Dragon Dormant
(CP Tir Mar, East Kingdom)
March 2, 2019, marks the end of my ongoing 'big project' when I was able to present the two baronial coronets I've been working on for the Barony of L'Ile du Dragon Dormant (CP Tir Mar, East Kingdom) at our Baronial Investiture Anniversary. 

These are the first coronets that I've ever made and the largest metalsmithing project I've ever taken on.  

Both coronets are about 4/5ths complete in this photograph. Due to my health issues and hand injury I would have been unable to complete them in time for IDD's Baronial Investiture Anniversary. Olev (Olivier Comeau), another talented Metalsmith, has completed them in time by adding the bottom edge trim and the pearl settings. 

My Facebook photo gallery of progress pictures with descriptions:

https://m.facebook.com/gaeira.aggadottir/albums/1102573719930158/


IDD Baronial Coronets, completed


*IDD Baronial Coronets, completed
Presented on March 2, 2019 at IDD's BIA

*Photograph by Olev (Olivier Comeau).

Riveting or...drill, hammer, repeat. Part 5


Making a Rivet from Wire 
with a Dome 'Front' and a Flush 'Back'
This is Part 5 of my series of blog posts about Riveting with a Nail Set tool. Please see Part 2 of my blog post series for general information and additional tips as well as Part 4 for how to use an Escutcheon pin or domed wire as your rivet.

Part 1 was about my two days of experimentation and practice with riveting; I worked on three different methods of using annealed, solid Brass Escutcheon pins as well as learning to use a Nail Set tool instead of a ball peen or riveting hammer as I was use to.


[IMAGE]
Way 3) Making a Rivet from Wire with a Dome 'Front' and a Flush 'Back'


1. Drill, debur, and insert the wire as shown.

Drill the holes that will hold the body of the rivet: 
Use drill bits that are the exact same diameter as the wire, a good fit gives better results. 

DO NOT counter sink either end of the drilled hole for this style of rivet.

Debur the openings of the drilled hole:

There are several ways of deburring, which leaves cleaner results:

  • sand the surface smooth to remove the sharp, raised metal
  • gently press a Round Bur, that is wider than the drilled hole, against the lip and twist a few times just enough to remove the excess metal bits
  • use slightly larger Drill Bit the same way you would a Round Bur
  • Be careful since the uneven edges could make either tool bounce out and scratch the surface. 

The wire must be annealed and 'Dead Soft': 
Hammering the metal into shape is easier the softer the metal is and requires fewer hammer strikes.


2. The finished 'Back' end touches the anvil, flush to the surface.

The rivet end that's resting against the anvil must be flush with the surface of the piece, usually it ends up as the 'Back' of the piece.


3. Cut the 'Front' end of the rivet to length and sand it flat. 

Cut the wire end that's at the 'Front' with a pair of flush wire cutting pliers. Use a sanding disk to remove any points so that the wire is flat, parallel with the surface of the piece.


4. Place the Nail Set tool, hammer it to form a dome.

The 'Front' end of the rivet gets domed by the Nail Set tool:
Nail Sets usually come in sets of three and each has a concave dome at the bottom with a different diameter and depth. It is better if the hole is not counter sunk. Chose the one from the set that best suits the diameter of the wire so that the concave half-sphere of the Nail Set tool is entirely filled to form a smooth dome. 

Place the concave dome of the Nail Set tool over the stub of the wire that's at the 'Front'. Rest the 'Back' of the piece flush against the anvil. Hammer several times in all 8 directions in opposite pairs, for example: north, south, then east, west, then NE, SW, and then SE, NW. This will spread the force of the hammer blows so that the wire end evenly reforms and fills the concave Nail Set and forms a dome.  

The flush end becomes a friction fit plug:

The end of the rivet that's resting against the anvil at the 'Back' must be flush with the surface of the piece. While hammering from the 'Front', the flattened end will get pushed against the anvil and expand to fill the drilled hole. This creates a strong rivet end, much like a stuck plug. The flush side is usually placed at the 'Back' of the piece since there's a smaller chance that the front of the piece can get damaged while pressed against the anvil.


Riveting: Using a Nail Set Tool and Escutcheon Pins


Riveting: Using a Nail Set Tool and Escutcheon Pins
You can see several examples of rivet styles #3 and #4 in the photographs of my experimentation, from the graphic at the top of blog post Part 3.

Riveting or...drill, hammer, repeat. Part 4

Riveting with an Escutcheon Pin, or with a Wire you've domed the 'Back'
This is Part 4 of my series of blog posts about Riveting with a Nail Set tool. Please see Part 2 of my blog post series for general information and additional tips.

Part 1 was about my two days of experimentation and practice with riveting; I worked on three different methods of using annealed, solid Brass Escutcheon pins as well as learning to use a Nail Set tool instead of a ball peen or riveting hammer as I was use to. 

[IMAGE]
Riveting with an Escutcheon Pin, or with a Wire you've domed the 'Back'

There are a variety of riveting kits and specialty riveting anvils that you can either purchase online or in a store. These tools help to turn one or even both ends of the rivet wire into a dome. 

You can also create your own dome making tool if the metal of your anvil is 'soft' enough to 'drill' into. A Round Bur will create a concave half-sphere on the surface of the anvil. Start by making a dimple with a scribe and drilling a very shallow pilot hole with a drill bit. This hole stabilized the Round Bur so you can remove enough metal to create the concave half-sphere that will hold and shape the rivet's dome. It can be used to made one end into a dome similar to an Escutcheon pin's or prevent an already domed rivet head from getting flattened while hammering the opposite end.

The advantage of using a solid Brass Escutcheon Pin are
  • it already comes with a pre-made domed head on one end which saves time from making it oneself
  • it's perfectly formed
  • it's a consistent size
  • a solid Brass pin can be annealed to make it easier to shape
  • even if it is scratched or damaged it will retain its color since it is not brass plated over steel


1. Drill, debur, and insert the Escutcheon pin or domed wire as shown.

Drill the holes that will hold the body of the rivet
Use drill bits that are the exact same diameter as the pin's shaft or wire, a good fit gives better results. Both ends of the open hole do not need to be counter sunk, but the side that the Escutcheon pin's dome rests should definitely not be counter sunk. The opposite end can be counter sunk which will make the rivet sturdier, but will require a longer rivet to fill the extra open area.

Debur the openings of the drilled hole:

There are several ways of deburring, which leaves cleaner results:

  • sand the surface smooth to remove the sharp, raised metal
  • gently press a Round Bur, that is wider than the drilled hole, against the lip and twist a few times just enough to remove the excess metal bits
  • use slightly larger Drill Bit the same way you would a Round Bur
  • Be careful since the uneven edges could make either tool bounce out and scratch the surface. 

The Escutcheon pin or wire must be annealed and 'Dead Soft'
Hammering the metal into shape is easier the softer the metal is and requires fewer hammer strikes. 


2. The Domed ‘Back’ end touches the anvil, it will get flattened.
Push the 'Back' down against the flat anvil so the dome sits flush against the bottom surface as shown, to create a tighter fit.


3. Cut the ‘Front’ end to length and sand it flat. 
Cut the 'Front' end of the wire with a pair of flush wire cutting pliers. Use a sanding disk to remove any points so that the wire is flat as shown.


4. Place the Nail Set tool and hammer it.
Place the concave dome of the Nail Set tool over the stub of the wire and rest the dome of the rivet onto the anvil. Hammer several times in all 8 directions in opposite pairs, for example: north, south, then east, west, then NE, SW, and then SE, NW. This will spread the force of the hammer blows so the wire end is evenly reformed and fills the concave area forming a dome.  

The 'Front' end of the rivet gets domed by the Nail Set tool:
Nail Sets usually come in sets of three and each tool has a concave dome at the bottom with a different diameter and depth. It is easier if the hole is not counter sunk. Chose the one tool from the set that best suits the diameter of the wire so as the dome forms it entirely fills the space to form a smooth dome. You might need to experiment with what length of wire you need to leave by making a couple as tests. Do note down the length needed for that diameter (gauge) of wire so next time you save yourself from needing to make a test rivet.


The pre-domed end gets slightly flattened:
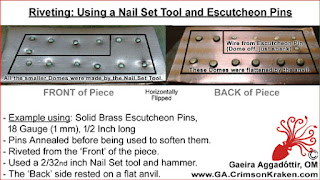
The dome resting against the anvil gets progressively flattened while hammering from the front. This flattened side is usually placed at the 'Back' of the piece for a couple of reasons: the flattened domes aren't necessarily all evenly flat and there's a smaller chance that the front of the piece can get damaged while pressed against the anvil.


Riveting: Using a Nail Set Tool and Escutcheon Pins

Riveting: Using a Nail Set Tool and Escutcheon Pins
You can see several examples of rivet styles #3 and #4 in the photographs of my experimentation, from the graphic at the top of blog post Part 3.

Riveting or...drill, hammer, repeat. Part 3

Drilling Holes for
 Various Rivet Styles
This is Part 3 of my series of blog posts about the different types of drilled holes and Rivet styles. Please see Part 2 of my blog post series for general information and additional tips. 

Part 1 was about my two days of experimentation and practice with riveting; I worked on three different methods of using annealed, solid Brass Escutcheon pins as well as learning to use a Nail Set tool instead of a ball peen or riveting hammer as I was use to. 

[IMAGE]
Drilling Holes for Various Rivet Styles:

#1-4 Just drilled
#5-7 Drilled & Counter Sunk

The Burs were removed & the Cross Sections are shown.

#1 This cross section example shows a drilled hole that's been deburred. 
This is probably the most common drilled hole for rivets.

#3 'Front' domes are made with a Nail Set tool.
'Back' end is an Escutcheon Pin with it's dome or Wire that was pre-domed.

#4 'Front' domes are made with a Nail Set tool.
'Back' end is Flush and works as a 'plug' since the end of the wire was compressed during the hammering when it couldn't move because the anvil blocked it. There's a lot of friction between the interior walls of the drilled hole and the jammed in metal from the wire.

#2's 'Front' is only to show how #4's 'Back' end looks like.

#5 This cross section example shows a drilled hole that's been counter-sunk at the 'Front' end, as well as deburred. 

#6 'Front' end was counter-sunk and the end of the rivet is Flush to the surface of the piece.  
'Back' end is an Escutcheon Pin with it's dome or Wire that was pre-domed.

#7 'Front' and 'Back' ends were counter-sunk and both ends of the rivet are Flush to the surface of the piece. 
This is a common style of rivet. To make a stronger rivet soldering both ends before filing and sanding away the excess metal from the hammering. Very little solder is needed.


Drill the holes that will hold the body of the rivet
Use drill bits that are the exact same diameter as the pin's shaft or wire, a good fit gives better results. If you need to make a wide hole it's often best to first make a Pilot Hole by first drilling through with a narrower drill bit. Trying to remove too much metal at once can cause issues for larger drill bits.

Debur the openings of the drilled hole:

There are several ways of deburring, which leaves cleaner results:

  • sand the surface smooth to remove the sharp, raised metal
  • gently press a Round Bur, that is wider than the drilled hole, against the lip and twist a few times just enough to remove the excess metal bits
  • use slightly larger Drill Bit the same way you would a Round Bur
  • Be careful since the uneven edges could make either tool bounce out and scratch the surface.

Riveting: Using a Nail Set Tool and Escutcheon Pins

Riveting: Using a Nail Set Tool 
and Escutcheon Pins
You can see several examples of rivet styles #3 and #4 in the photographs of my experimentation, from the graphic at the top of this blog post.

Riveting or...drill, hammer, repeat. Part 2

Riveting: Using a Nail Set Tool 
and Escutcheon Pins

This is Part 2 of my series of blog posts about the different types of drilled holes and Rivet styles. 

Part 1 was about my two days of experimentation and practice with riveting; I worked on three different methods of using annealed, solid Brass Escutcheon pins as well as learning to use a Nail Set tool instead of a ball peen or riveting hammer as I was use to. 

Several months ago I posted about my two days of experimentation and practice with riveting; I worked on three different methods of using annealed, solid Brass Escutcheon pins. Three things were new to me: method #3, using a Nail Set tool, and using Escutcheon pins as rivets.

Usually I use a length of annealed wire to make my rivets and hinge pins. Using a Nail Set tool and hammer was easier and faster for me to form the rivet head compared to using either a ball peen or riveting hammer. It was fun experimenting and the results were very satisfactory. 

Several people asked me how I riveted the Baronial coronets so I decided to write additional blog posts about the techniques and tools. I've created several 'Info Sheet' images to better illustrate how they look from different angles and I added some key details as bullet points.


General Information:

Usually during the riveting process I use plain wire and create the rivet heads on both sides myself using a ball peen hammer. A rivet head can be formed by hammering each end of the wire a bit before flipping the piece over and hammering that side a bit as well, this back and forth, from one side to the other, slowly creates a tight rivet. 

One method of hammering a rivet head with a ball peen or riveting hammer is by using a striking motion that starts at the center and slides outward. Hammer several times in all 8 directions in opposite pairs, for example: north, south, then east, west, then NE, SW, and then SE, NW. This will spread the force of the hammer blows so the wire end is evenly reformed.

If the mouth of a drilled hole is not counter sunk then a rivet head, usually domed, is needed to secure the ends. These large domed / 'mushroom' head / champagne cork shaped ends prevent the rivet from moving or falling out like a tight plug, and they secure the pieces of metal together.

If the opening of the hole is counter sunk then it can be filed in with metal from the wire and filed or sanded down to leave a flush surface which is difficult to see. The counter sunk area creates a space within the surface of the metal and acts like the dome does, as a plug. These can be referred to as 'Flush Rivets' or invisible rivets. Better yet, before filing/sanding it flush one can delicately solder the end secure with a very tiny piece of solder. Once sanded it can be nearly invisible and stronger. I like using these soldered ends for certain hinges, when done properly the hinge still moves freely; too much solder risks it flowing past the dome and immobilizing the hinge.

Instead of using a wire or pin as a riveted one can use a tube. A slightly different hammering technique is required since there's only metal lining the drilled hole. We want to keep the tube rivet open and hallow. In this series of blog posts I will not be covering the methods of using a tube as a rivet.

Choose the style of rivet ends that best suit the needs of your piece and the materials that are being used. Rivets can add visual texture since some styles stick out from the surface.


Nail Set tool:

These are two of the main advantages of using a Nail Set tool that's struck by a hammer to form a rivet head, instead of using either a ball peen or riveting hammer:

  • to leave a rounded button end which is consistent in shape and size
  • there's a much lower chance of damaging or marking up the surface of the piece around the rivet head

I used the following sized Nail Set tools when striking the 'Front' end of the wire to form a dome:

  • a 2/32nds inch Nail Set tool for a 18 gauge (1 mm) wire end
  • a 3/32nd inch Nail Set tool for the dome of the 18 gauge Escutcheon pins. The pin's shaft is 18 gauge (1 mm) so the diameter at the base of the dome is wider.


Drilling Holes for Various Rivet Styles


Drilling Holes for
Various Rivet Styles
With these 3D images that I created you can see a close up of both style of rivets, #3 and #4, in a cross section view.

Pinned Post

Welcome to my new blog site.

I look forward to posting about my on going projects and research here. I would like to share with you links to my various online researc...